Processing different data types#
ในบทนี้ คุณจะได้เรียนรู้วิธีการประมวลผลข้อมูลประเภทต่างๆ โดยใช้ n8n core nodes
HTML and XML data#
คุณน่าจะคุ้นเคยกับ HTML และ XML อยู่แล้ว
HTML vs. XML
HTML เป็น markup language ที่ใช้ในการอธิบายโครงสร้างและความหมายของหน้าเว็บ XML ดูคล้ายกับ HTML แต่ชื่อ tag จะแตกต่างกัน เนื่องจากใช้อธิบายประเภทของข้อมูลที่เก็บอยู่
หากคุณต้องการประมวลผลข้อมูล HTML หรือ XML ใน n8n workflows ของคุณ ให้ใช้ HTML node หรือ XML node
ใช้ HTML node เพื่อดึงเนื้อหา HTML ของหน้าเว็บโดยอ้างอิง CSS selectors ซึ่งมีประโยชน์หากคุณต้องการรวบรวมข้อมูลที่มีโครงสร้างจากเว็บไซต์ (web-scraping)
HTML Exercise#
มาลองดึง title ของโพสต์ล่าสุดในบล็อก n8n กัน:
- ใช้ HTTP Request node เพื่อส่ง GET request ไปยัง URL
https://blog.n8n.io/(endpoint นี้ไม่ต้องใช้ authentication) - เชื่อมต่อ HTML node และกำหนดค่าให้ดึง title ของโพสต์แรกบนหน้าเว็บ
- คำใบ้: หากคุณไม่คุ้นเคยกับ CSS selectors หรือการอ่าน HTML, CSS selector
.post .item-title aน่าจะช่วยได้!
- คำใบ้: หากคุณไม่คุ้นเคยกับ CSS selectors หรือการอ่าน HTML, CSS selector
Show me the solution
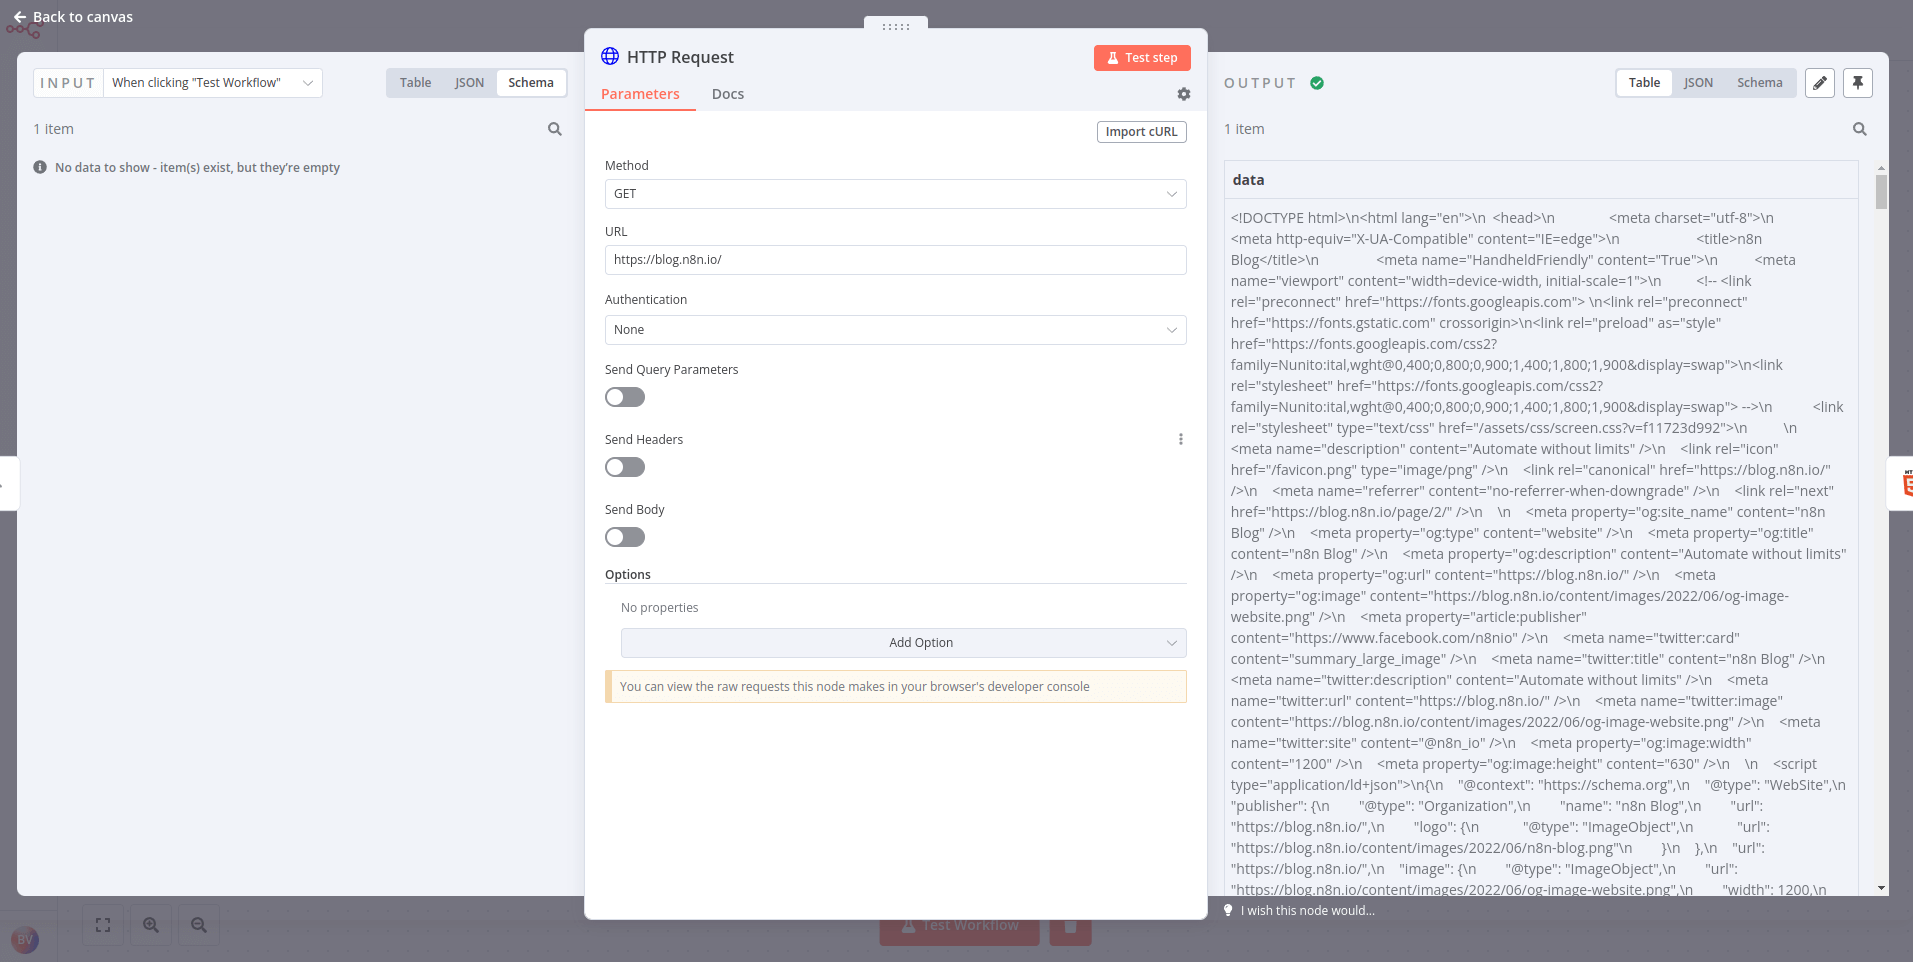
- กำหนดค่า HTTP Request node ด้วย parameters ต่อไปนี้:
- Authentication: None
- Request Method: GET
- URL: https://blog.n8n.io/ ผลลัพธ์ควรมีลักษณะดังนี้:
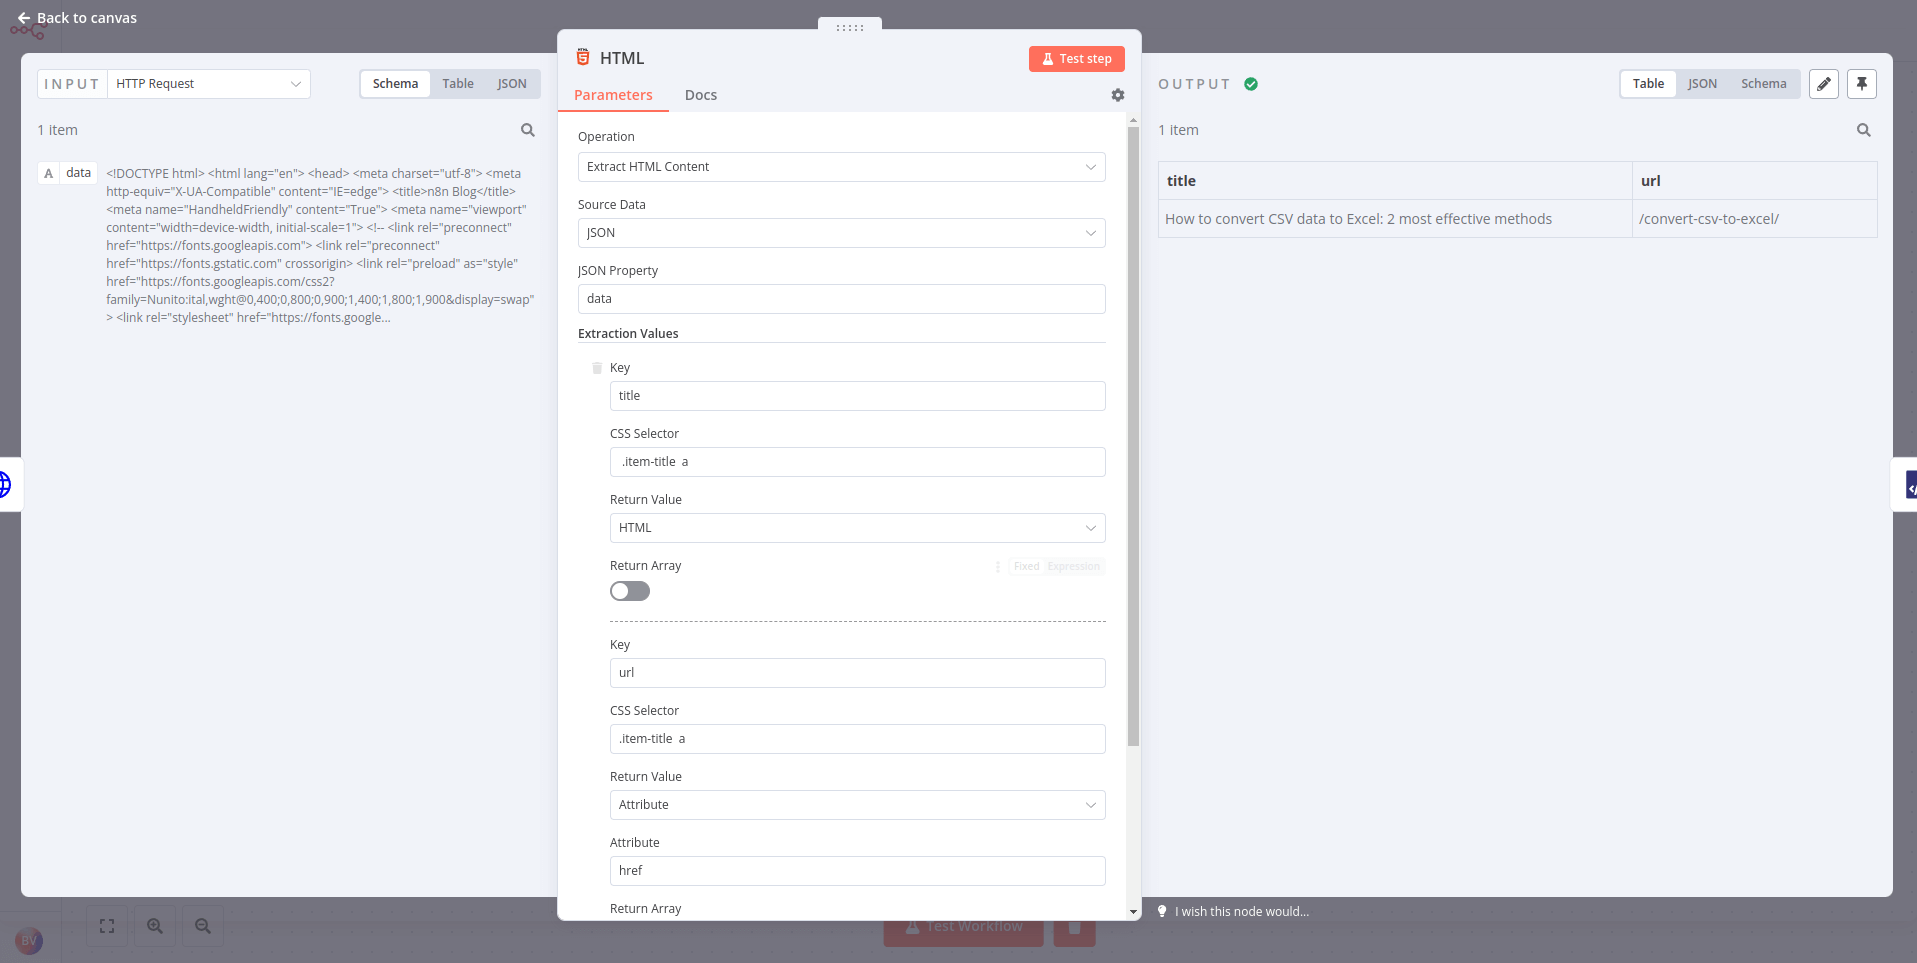
- เชื่อมต่อ HTML node เข้ากับ HTTP Request node และกำหนดค่า parameters ของ HTML node ดังนี้:
- Operation: Extract HTML Content
- Source Data: JSON
- JSON Property: data
- Extraction Values:
- Key: title
- CSS Selector:
.post .item-title a - Return Value: HTML
คุณสามารถเพิ่ม values เพิ่มเติมเพื่อดึงข้อมูลอื่นๆ ได้
ผลลัพธ์ควรมีลักษณะดังนี้:
ใช้ XML node เพื่อแปลง XML เป็น JSON และ JSON เป็น XML การดำเนินการนี้มีประโยชน์หากคุณทำงานกับ web services ต่างๆ ที่ใช้ XML หรือ JSON และต้องการรับและส่งข้อมูลระหว่างกันในสองรูปแบบนี้
XML Exercise#
ใน final exercise of Chapter 1 คุณได้ใช้ HTTP Request node เพื่อส่ง request ไปยัง PokéAPI ในแบบฝึกหัดนี้ เราจะกลับไปที่ API เดิม แต่เราจะแปลง output เป็น XML:
- เพิ่ม HTTP Request node ที่ส่ง request เดิมไปยัง PokéAPI ที่
https://pokeapi.co/api/v2/pokemon - ใช้ XML node เพื่อแปลง JSON output เป็น XML
Show me the solution
- หากต้องการรับ pokemon จาก PokéAPI ให้ execute HTTP Request node ด้วย parameters ต่อไปนี้:
- Authentication: None
- Request Method: GET
- URL: https://pokeapi.co/api/v2/pokemon
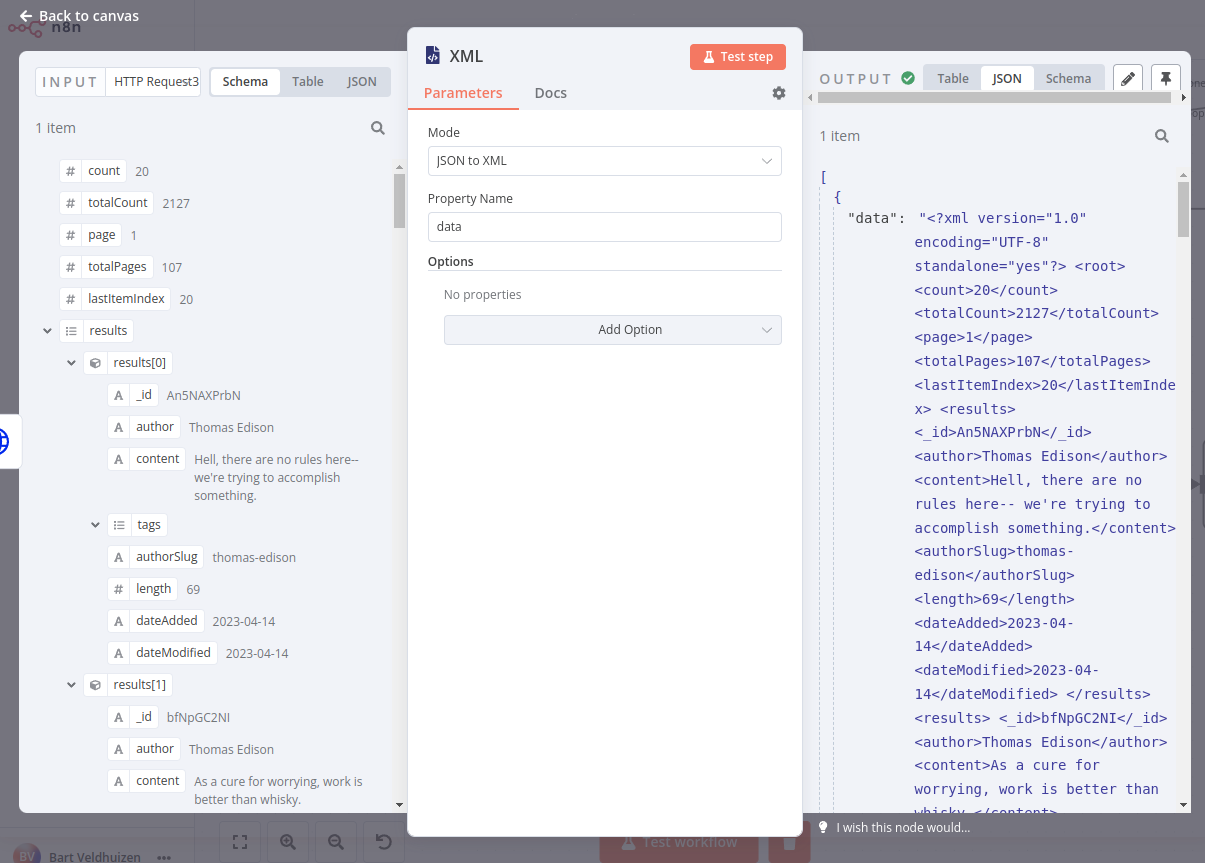
- เชื่อมต่อ XML node เข้ากับมันด้วย parameters ต่อไปนี้:
- Mode: JSON to XML
- Property name: data
ผลลัพธ์ควรมีลักษณะดังนี้:
หากต้องการแปลงข้อมูลในทิศทางตรงกันข้าม ให้เลือก mode XML to JSON
Date, time, and interval data#
ประเภทข้อมูล Date และ time รวมถึง DATE, TIME, DATETIME, TIMESTAMP, และ YEAR วันที่และเวลาสามารถส่งผ่านในรูปแบบต่างๆ ได้ ตัวอย่างเช่น:
DATE: March 29 2022, 29-03-2022, 2022/03/29TIME: 08:30:00, 8:30, 20:30DATETIME: 2022/03/29 08:30:00TIMESTAMP: 1616108400 (Unix timestamp), 1616108400000 (Unix ms timestamp)YEAR: 2022, 22
มีสองสามวิธีที่คุณสามารถทำงานกับวันที่และเวลาได้:
- ใช้ Date & Time node เพื่อแปลงข้อมูลวันที่และเวลาเป็นรูปแบบต่างๆ และคำนวณวันที่
- ใช้ Schedule Trigger node เพื่อกำหนดเวลาให้ workflows ทำงานในเวลา, ช่วงเวลา, หรือระยะเวลาที่ระบุ
บางครั้ง คุณอาจต้องหยุดการ execute workflow ชั่วคราว ซึ่งอาจจำเป็นหากคุณรู้ว่า service ไม่ได้ประมวลผลข้อมูลทันที หรือใช้เวลานานในการคืนผลลัพธ์ทั้งหมด ในกรณีเหล่านี้ คุณไม่ต้องการให้ n8n ส่งข้อมูลที่ไม่สมบูรณ์ไปยัง node ถัดไป
หากคุณเจอกับสถานการณ์เช่นนี้ ให้ใช้ Wait node หลังจาก node ที่คุณต้องการหน่วงเวลา Wait node จะหยุดการ execute workflow ชั่วคราวและจะกลับมาทำงานต่อ:
- ณ เวลาที่ระบุ
- หลังจากช่วงเวลาที่ระบุ
- เมื่อมีการเรียก webhook
Date Exercise#
สร้าง workflow ที่เพิ่มห้าวันให้กับ input date จาก Customer Datastore node ที่คุณเคยใช้ก่อนหน้านี้ จากนั้น หากวันที่ที่คำนวณได้เกิดขึ้นหลังปี 1959 workflow จะรอ 1 นาทีก่อนที่จะ setting วันที่ที่คำนวณได้เป็น value workflow ควรถูก trigger ทุกๆ 30 นาที
ในการเริ่มต้น:
- เพิ่ม Customer Datastore (n8n training) node โดยเลือก action Get All People Return All
- เพิ่ม Date & Time node เพื่อ Round Up วันที่ created จาก datastore เป็น End of Month ส่ง output นี้ไปยัง field new-date รวม input fields ทั้งหมด
- เพิ่ม If node เพื่อตรวจสอบว่าวันที่ที่ปัดเศษใหม่นั้นอยู่หลัง
1960-01-01 00:00:00หรือไม่ - เพิ่ม Wait node ไปยัง True output ของ node นั้นและตั้งค่าให้รอหนึ่งนาที
- เพิ่ม Edit Fields (Set) node เพื่อตั้งค่า field ใหม่ชื่อ outputValue เป็น String ที่มี new-date รวม input fields ทั้งหมด
- เพิ่ม Schedule Trigger node ที่จุดเริ่มต้นของ workflow เพื่อ trigger ทุกๆ 30 นาที (คุณสามารถเก็บ Manual Trigger node ไว้สำหรับการทดสอบได้!)
Show me the solution
- เพิ่ม Customer Datastore (n8n training) node โดยเลือก action Get All People
- เลือก option Return All
- เพิ่ม Date & Time node ที่เชื่อมต่อกับ Customer Datastore node เลือก option Round a Date
- เพิ่ม
createddate เป็น Date ที่จะปัดเศษ - เลือก
Round Upเป็น Mode และEnd of Monthเป็น To - ตั้งค่า Output Field Name เป็น
new-date - ใน Options เลือก Add Option และใช้ control เพื่อ Include Input Fields
- เพิ่ม
- เพิ่ม If node ที่เชื่อมต่อกับ Date & Time node
- เพิ่ม field new-date เป็นส่วนแรกของ condition
- ตั้งค่า comparison เป็น Date &Time > is after
- เพิ่ม
1960-01-01 00:00:00เป็นส่วนที่สองของ expression (ควรจะได้ 3 items ใน True Branch และ 2 items ใน False Branch)
- เพิ่ม Wait node ไปยัง True output ของ If node
- ตั้งค่า Resume เป็น
After Time interval - ตั้งค่า Wait Amount เป็น
1.00 - ตั้งค่า Wait Unit เป็น
Minutes
- ตั้งค่า Resume เป็น
- เพิ่ม Edit Fields (Set) node ไปยัง Wait node
- ใช้ Mode เป็น JSON หรือ Manual Mapping อย่างใดอย่างหนึ่ง
- ตั้งค่า field ใหม่ชื่อ
outputValueให้เป็น value ของ field new-date - เลือก option Include Other Input Fields และ include All fields
- เพิ่ม Schedule Trigger node ที่จุดเริ่มต้นของ workflow
- ตั้งค่า Trigger Interval ให้ใช้
Minutes - ตั้งค่า Minutes Between Triggers เป็น 30
- หากต้องการทดสอบ schedule ของคุณ อย่าลืม activate workflow
- อย่าลืมเชื่อมต่อ node นี้กับ Customer Datastore (n8n training) node ที่คุณเริ่มต้นด้วย!
- ตั้งค่า Trigger Interval ให้ใช้
workflow ควรมีลักษณะดังนี้:
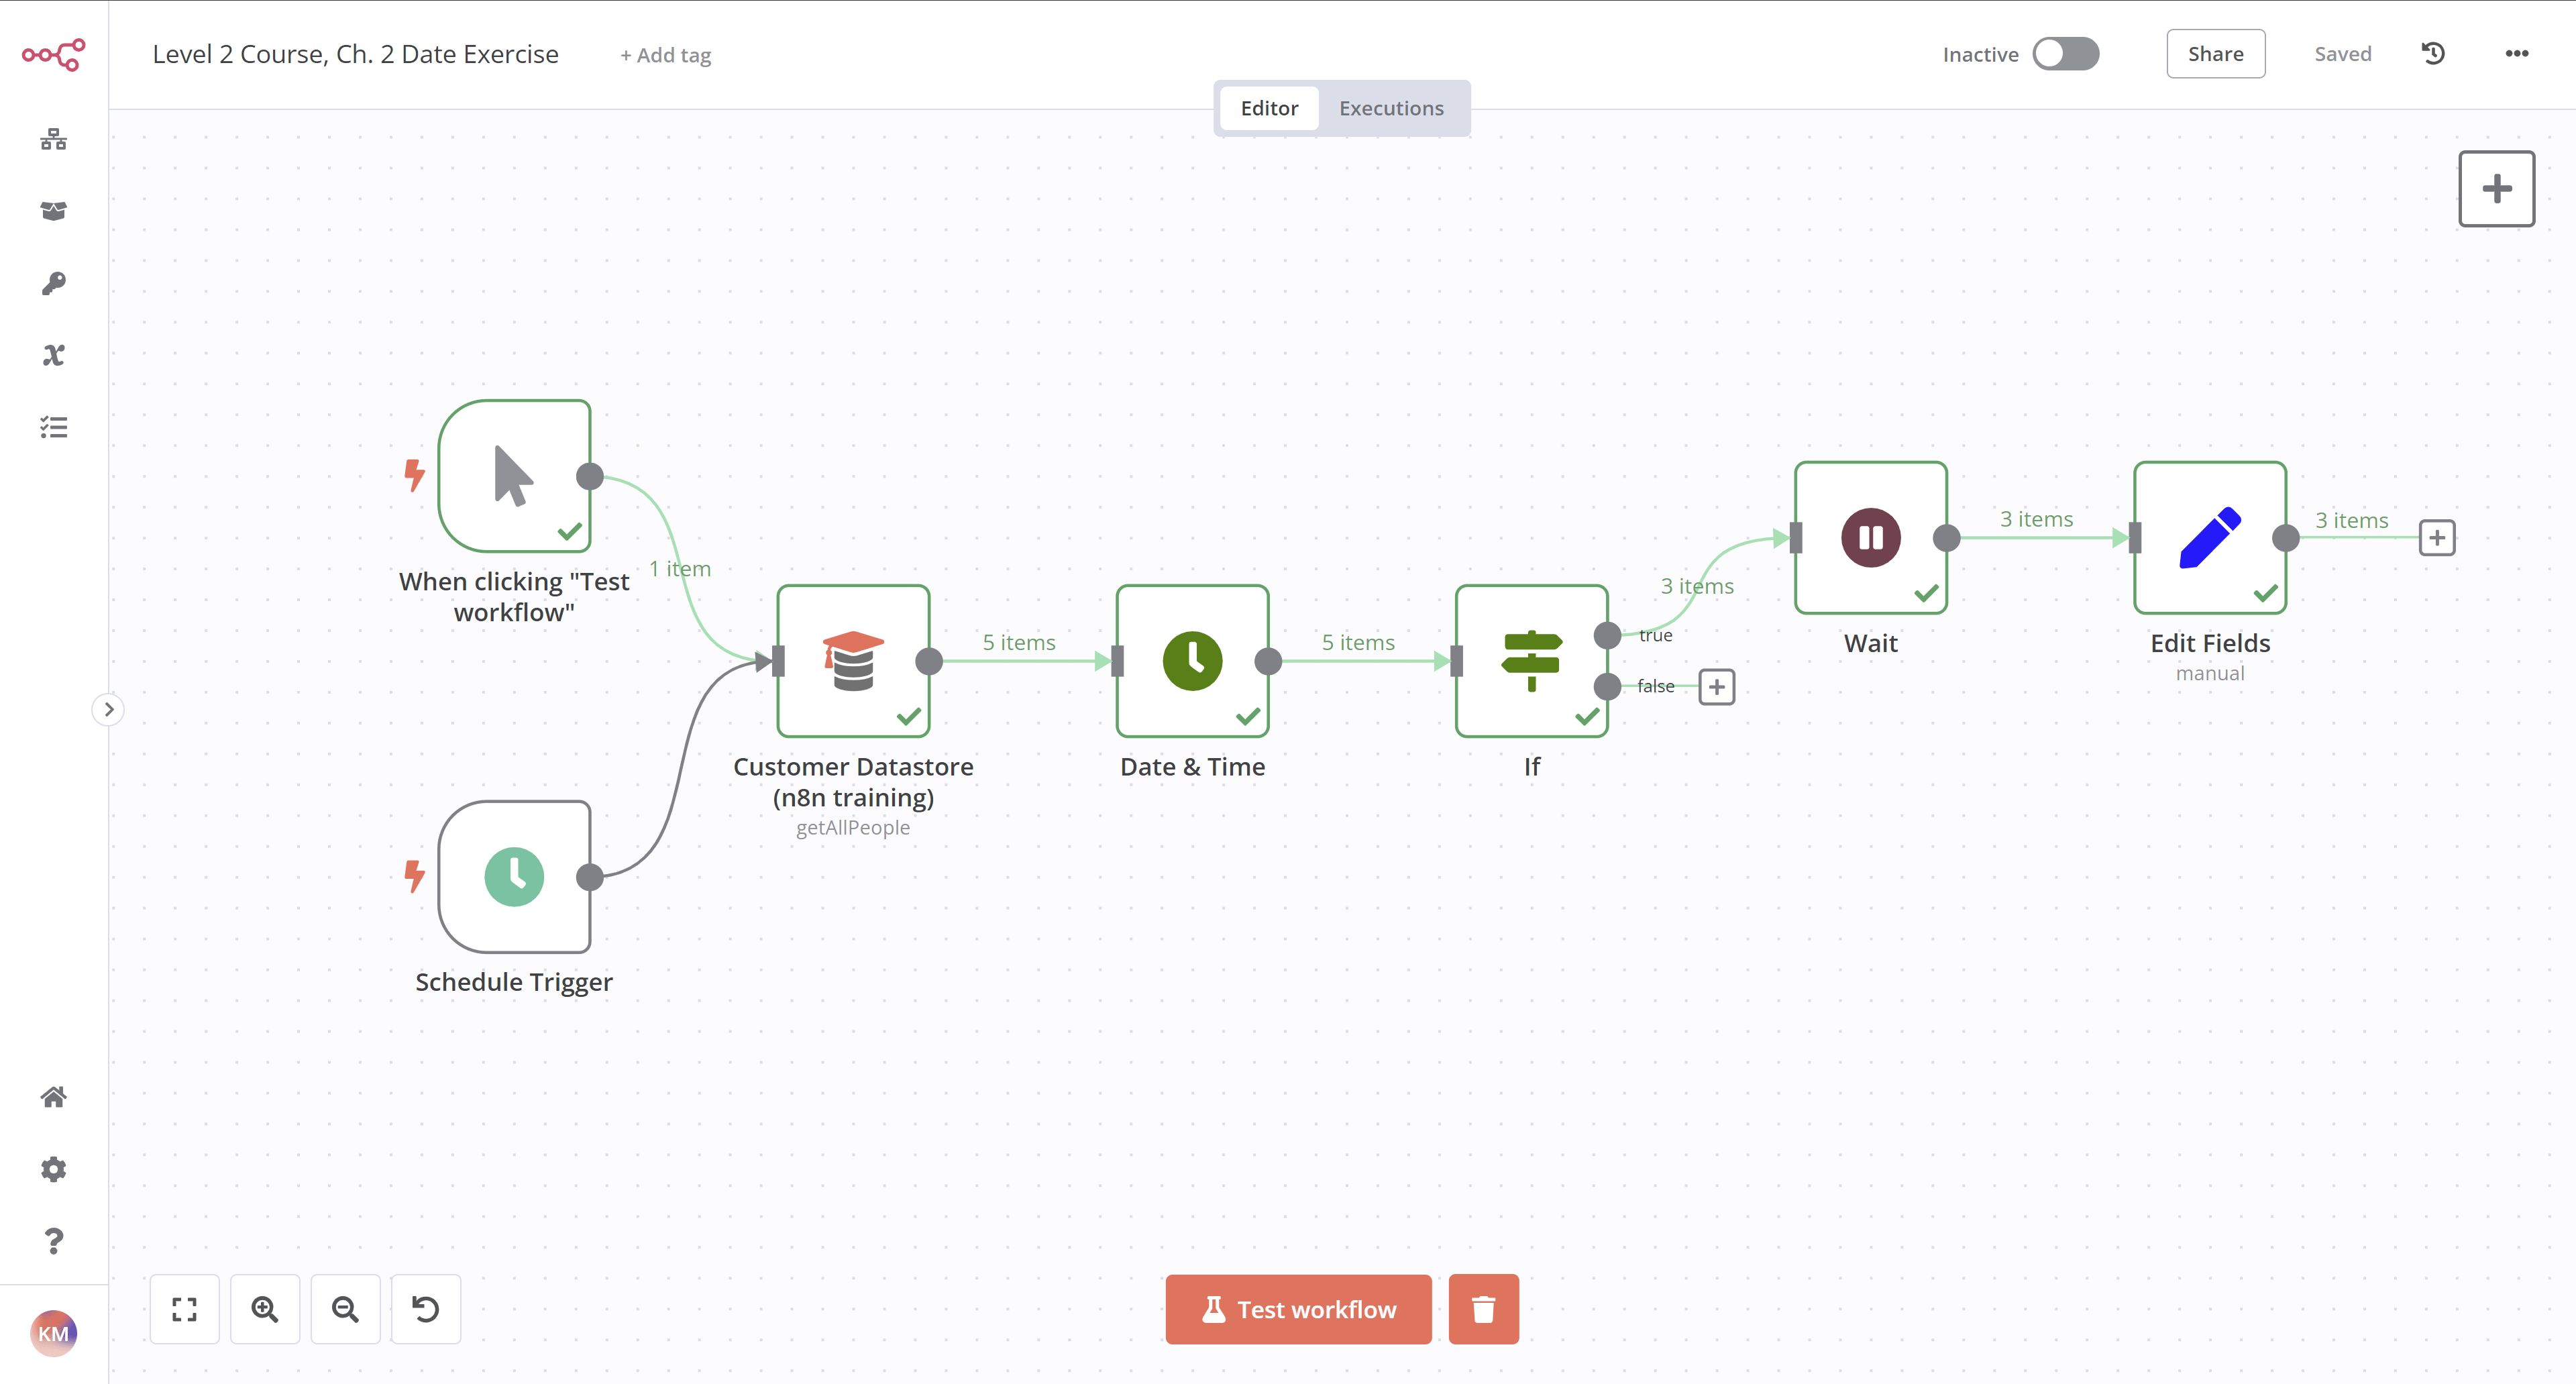
หากต้องการตรวจสอบการกำหนดค่าของแต่ละ node คุณสามารถคัดลอกโค้ด JSON ของ workflow นี้และวางลงใน Editor UI หรือบันทึกเป็นไฟล์และ import จากไฟล์ลงใน workflow ใหม่ ดู Export and import workflows สำหรับข้อมูลเพิ่มเติม
1 2 3 4 5 6 7 8 9 10 11 12 13 14 15 16 17 18 19 20 21 22 23 24 25 26 27 28 29 30 31 32 33 34 35 36 37 38 39 40 41 42 43 44 45 46 47 48 49 50 51 52 53 54 55 56 57 58 59 60 61 62 63 64 65 66 67 68 69 70 71 72 73 74 75 76 77 78 79 80 81 82 83 84 85 86 87 88 89 90 91 92 93 94 95 96 97 98 99 100 101 102 103 104 105 106 107 108 109 110 111 112 113 114 115 116 117 118 119 120 121 122 123 124 125 126 127 128 129 130 131 132 133 134 135 136 137 138 139 140 141 142 143 144 145 146 147 148 149 150 151 152 153 154 155 156 157 158 159 160 161 162 163 164 165 166 167 168 169 170 171 172 173 174 175 176 177 178 179 180 181 182 183 184 185 186 187 188 189 190 191 192 193 194 195 196 197 198 199 200 201 202 203 204 205 206 207 208 209 | |
Binary data#
จนถึงตอนนี้ คุณได้ทำงานกับข้อมูล text เป็นหลัก แต่ถ้าคุณต้องการประมวลผลข้อมูลที่ไม่ใช่ text เช่น รูปภาพหรือไฟล์ PDF ล่ะ? ไฟล์ประเภทนี้จะถูกแสดงในระบบเลขฐานสอง ดังนั้นจึงถือว่าเป็น binary data ในรูปแบบนี้ binary data ไม่ได้ให้ข้อมูลที่เป็นประโยชน์แก่คุณ ดังนั้นคุณจะต้องแปลงให้อยู่ในรูปแบบที่อ่านได้
ใน n8n คุณสามารถประมวลผล binary data ด้วย nodes ต่อไปนี้:
- HTTP Request เพื่อ request และส่งไฟล์จาก/ไปยัง web resources และ APIs
- Read/Write Files from Disk เพื่ออ่านและเขียนไฟล์จาก/ไปยังเครื่องที่ n8n กำลังทำงานอยู่
- Convert to File เพื่อรับ input data และส่ง output เป็นไฟล์
- Extract From File เพื่อรับข้อมูลจากรูปแบบ binary และแปลงเป็น JSON
Reading and writing files is only available on self-hosted n8n
การอ่านและเขียนไฟล์ไปยัง disk ไม่สามารถใช้งานได้บน n8n Cloud คุณจะอ่านและเขียนไปยังเครื่องที่คุณติดตั้ง n8n หากคุณรัน n8n ใน Docker คำสั่งของคุณจะทำงานใน n8n container ไม่ใช่ Docker host Read/Write Files From Disk node จะมองหาไฟล์ที่สัมพันธ์กับ n8n install path n8n แนะนำให้ใช้ absolute file paths เพื่อป้องกันข้อผิดพลาดใดๆ
ในการอ่านหรือเขียน binary file คุณต้องเขียน path (ตำแหน่ง) ของไฟล์ใน parameter File(s) Selector ของ node (สำหรับการดำเนินการ Read) หรือใน parameter File Path and Name ของ node (สำหรับการดำเนินการ Write)
Naming the right path
file path จะดูแตกต่างกันเล็กน้อยขึ้นอยู่กับว่าคุณกำลังรัน n8n อย่างไร:
- npm:
~/my_file.json - n8n cloud / Docker:
/tmp/my_file.json
Binary Exercise 1#
สำหรับแบบฝึกหัด binary แรกของเรา มาแปลงไฟล์ PDF เป็น JSON กัน:
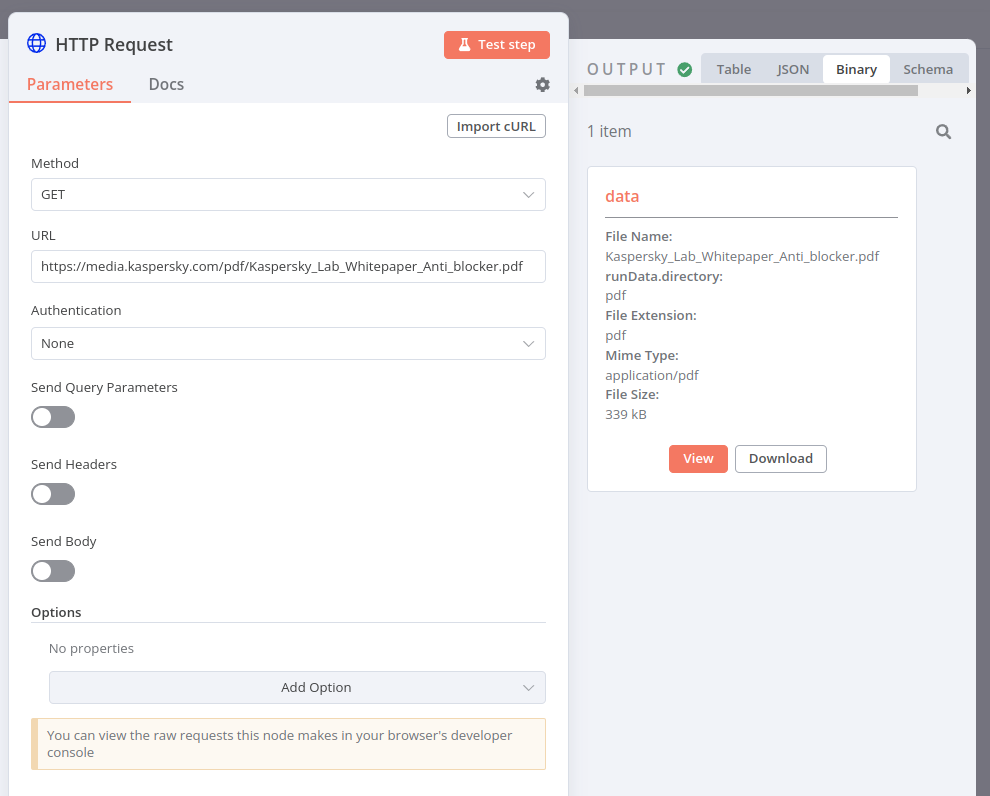
- ส่ง HTTP request เพื่อรับไฟล์ PDF นี้:
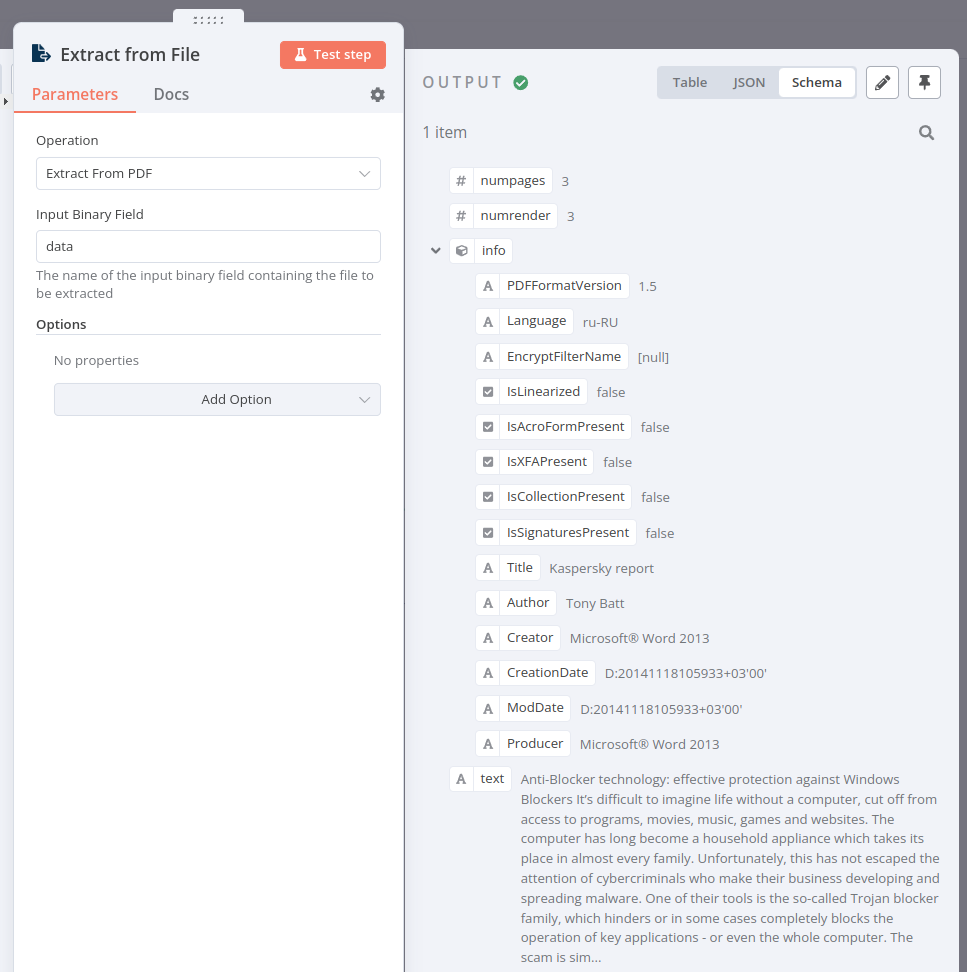
https://media.kaspersky.com/pdf/Kaspersky_Lab_Whitepaper_Anti_blocker.pdf. - ใช้ Extract From File node เพื่อแปลงไฟล์จาก binary เป็น JSON
Show me the solution
ใน HTTP Request node คุณควรเห็นไฟล์ PDF ดังนี้:
เมื่อคุณแปลง PDF จาก binary เป็น JSON โดยใช้ Extract From File node ผลลัพธ์ควรมีลักษณะดังนี้:
หากต้องการตรวจสอบการกำหนดค่าของ nodes คุณสามารถคัดลอกโค้ด JSON workflow ด้านล่างและวางลงใน Editor UI ของคุณ:
1 2 3 4 5 6 7 8 9 10 11 12 13 14 15 16 17 18 19 20 21 22 23 24 25 26 27 28 29 30 31 32 33 34 35 36 37 38 39 40 41 42 43 44 45 46 47 48 49 50 51 52 53 54 55 56 57 58 59 60 61 62 63 64 65 66 67 68 69 | |
Binary Exercise 2#
สำหรับแบบฝึกหัด binary ที่สองของเรา มาแปลงข้อมูล JSON บางส่วนเป็น binary กัน:
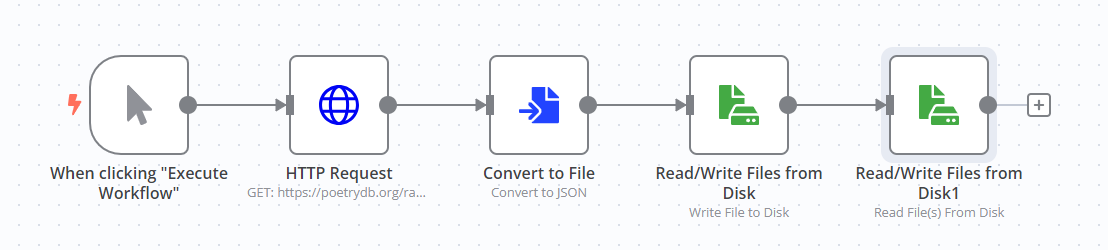
- ส่ง HTTP request ไปยัง Poetry DB API
https://poetrydb.org/random/1 - แปลงข้อมูลที่ส่งคืนจาก JSON เป็น binary โดยใช้ Convert to File node
- เขียนข้อมูล binary file ใหม่ไปยังเครื่องที่ n8n กำลังทำงานอยู่โดยใช้ Read/Write Files From Disk node
- หากต้องการตรวจสอบว่าทำงานได้หรือไม่ ให้ใช้ Read/Write Files From Disk node เพื่ออ่าน binary file ที่สร้างขึ้น
Show me the solution
workflow สำหรับแบบฝึกหัดนี้มีลักษณะดังนี้:
หากต้องการตรวจสอบการกำหนดค่าของ nodes คุณสามารถคัดลอกโค้ด JSON workflow ด้านล่างและวางลงใน Editor UI ของคุณ:
1 2 3 4 5 6 7 8 9 10 11 12 13 14 15 16 17 18 19 20 21 22 23 24 25 26 27 28 29 30 31 32 33 34 35 36 37 38 39 40 41 42 43 44 45 46 47 48 49 50 51 52 53 54 55 56 57 58 59 60 61 62 63 64 65 66 67 68 69 70 71 72 73 74 75 76 77 78 79 80 81 82 83 84 85 86 87 88 89 90 91 92 93 94 95 96 97 98 99 100 101 102 103 104 105 106 107 108 109 110 111 112 113 114 115 116 117 118 119 120 | |