Queue mode#
คุณสามารถรัน n8n ได้หลายโหมดตามความต้องการ Queue mode จะช่วยให้ขยายระบบได้ดีที่สุด
Binary data storage
n8n ยังไม่รองรับ queue mode กับ binary data storage แบบ filesystem ถ้า workflow ของคุณต้องเก็บ binary data ใน queue mode ให้ใช้ S3 external storage
How it works#
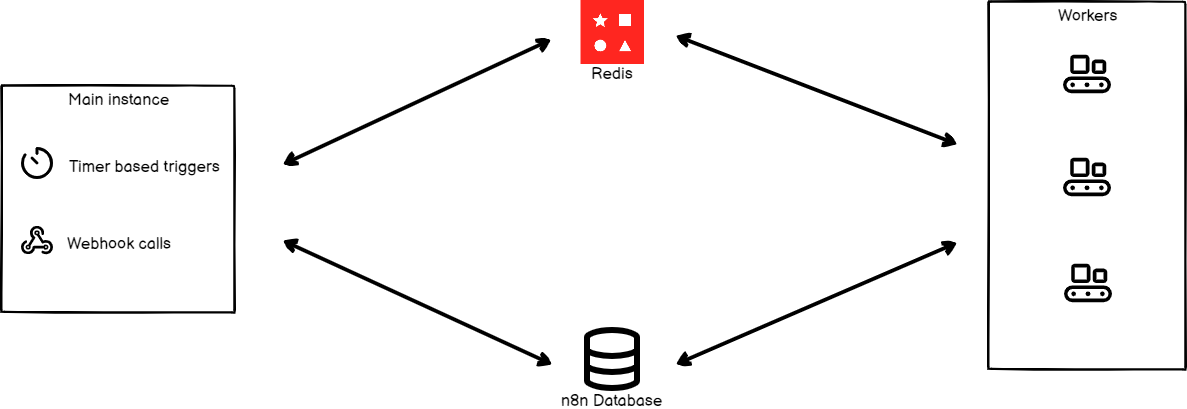
เมื่อรันใน queue mode คุณจะมี n8n หลาย instance โดยมี instance หลัก (main) รับข้อมูล workflow (เช่น trigger) และ worker instance จะเป็นคนประมวลผล execution
แต่ละ worker จะเป็น Node.js instance แยกกัน รันในโหมด main แต่สามารถประมวลผล workflow หลายตัวพร้อมกันได้ เพราะ worker มี IOPS (input-output operations per second) สูง
การใช้ worker instance และ queue mode ช่วยให้คุณขยาย n8n ได้ตาม workload โดยเพิ่มหรือลดจำนวน worker
ขั้นตอนการทำงานเป็นแบบนี้:
- main n8n instance จะจัดการ timer และ webhook call สร้าง execution ของ workflow (แต่ยังไม่รัน)
- มันจะส่ง execution ID ไปที่ message broker คือ Redis ซึ่งจะคิว execution ที่รออยู่ และให้ worker ที่ว่างรับไปทำ
- worker ใน pool จะรับ message จาก Redis
- worker จะใช้ execution ID ไปดึงข้อมูล workflow จาก database
- เมื่อ workflow execution เสร็จ worker จะ:
- เขียนผลลัพธ์ลง database
- แจ้ง Redis ว่า execution เสร็จแล้ว
- Redis จะ notify กลับไปที่ main instance
Configuring workers#
Worker คือ n8n instance ที่ทำงานจริง จะรับข้อมูลจาก main process ว่า workflow ไหนต้อง execute, ทำงานนั้น และอัปเดตสถานะเมื่อเสร็จ
Set encryption key#
n8n จะสร้าง encryption key อัตโนมัติเมื่อเริ่มต้นครั้งแรก หรือจะกำหนดเองผ่าน environment variable ก็ได้
encryption key ของ main instance ต้องใช้ร่วมกับ worker และ webhook processor ทุกตัว เพื่อให้ worker เข้าถึง credentials ใน database ได้
ตั้งค่า encryption key ให้แต่ละ worker ใน configuration file หรือผ่าน environment variable:
1 | |
Set executions mode#
Database considerations
n8n แนะนำให้ใช้ Postgres 13+ ถ้ารัน n8n execution mode เป็น queue กับ SQLite ไม่แนะนำ
ตั้ง environment variable EXECUTIONS_MODE เป็น queue ทั้ง main instance และ worker ด้วยคำสั่งนี้
1 | |
หรือจะตั้ง executions.mode เป็น queue ใน configuration file ก็ได้
Start Redis#
Running Redis on a separate machine
คุณสามารถรัน Redis บนเครื่องอื่นได้ แค่ให้ n8n instance เข้าถึง Redis ได้
ถ้าจะรัน Redis ใน Docker ใช้คำสั่งนี้:
1 | |
โดยปกติ Redis จะรันที่ localhost port 6379 ไม่มี password ถ้าคุณตั้งค่า Redis ต่างไป ให้ตั้งค่าตามนี้ใน main n8n process เพื่อให้ n8n ติดต่อ Redis ได้
| Using configuration file | Using environment variables | Description |
|---|---|---|
queue.bull.redis.host:localhost |
QUEUE_BULL_REDIS_HOST=localhost |
โดยปกติ Redis จะรันที่ localhost |
queue.bull.redis.port:6379 |
QUEUE_BULL_REDIS_PORT=6379 |
port เริ่มต้นคือ 6379 ถ้าเปลี่ยน port ให้ตั้งค่าตามนั้น |
ตั้งค่าเพิ่มเติมได้ดังนี้:
| Using configuration file | Using environment variables | Description |
|---|---|---|
queue.bull.redis.username:USERNAME |
QUEUE_BULL_REDIS_USERNAME |
โดยปกติ Redis ไม่ต้องใช้ username ถ้ามีให้ตั้งค่าตามนี้ |
queue.bull.redis.password:PASSWORD |
QUEUE_BULL_REDIS_PASSWORD |
โดยปกติ Redis ไม่ต้องใช้ password ถ้ามีให้ตั้งค่าตามนี้ |
queue.bull.redis.db:0 |
QUEUE_BULL_REDIS_DB |
ค่าเริ่มต้นคือ 0 ถ้าเปลี่ยนให้ตั้งค่าตามนั้น |
queue.bull.redis.timeoutThreshold:10000ms |
QUEUE_BULL_REDIS_TIMEOUT_THRESHOLD |
กำหนดเวลารอ Redis ถ้าไม่พร้อม (ms) ค่าเริ่มต้น 10000 |
queue.bull.gracefulShutdownTimeout:30 |
N8N_GRACEFUL_SHUTDOWN_TIMEOUT |
เวลารอให้ worker ทำงานเสร็จก่อนปิด process ค่าเริ่มต้น 30 วินาที |
ตอนนี้คุณสามารถสตาร์ท n8n instance ให้เชื่อมต่อ Redis ได้แล้ว
Start workers#
คุณต้องสตาร์ท worker process เพื่อให้ n8n execute workflow ได้ ถ้าจะรัน worker บนเครื่องอื่น ให้ติดตั้ง n8n และเชื่อมต่อ Redis กับ database ให้เรียบร้อย
สตาร์ท worker ด้วยคำสั่งนี้จาก root directory:
1 | |
ถ้าใช้ Docker ใช้คำสั่งนี้:
1 | |
คุณสามารถตั้ง worker หลาย process ได้ ให้แน่ใจว่า worker ทุกตัวเข้าถึง Redis และ database ได้
Worker server#
แต่ละ worker process จะรัน server ที่เปิด endpoint เหล่านี้ (ถ้าตั้ง QUEUE_HEALTH_CHECK_ACTIVE):
/healthz: เช็คว่า worker ยังรันอยู่/healthz/readiness: เช็คว่า worker ต่อ DB และ Redis ได้หรือยัง- credentials overwrite endpoint
/metrics
View running workers#
Feature availability
- ใช้ได้เฉพาะ Self-hosted Enterprise plans
- ถ้าอยากใช้บน Cloud Enterprise ติดต่อ n8n
คุณสามารถดู worker ที่กำลังรันและ performance metrics ได้ใน n8n ที่ Settings > Workers
Running n8n with queues#
เมื่อรัน n8n แบบ queue งาน workflow production ทั้งหมดจะถูกประมวลผลโดย worker process แม้แต่ webhook call ก็จะถูกส่งไป worker ซึ่งอาจเพิ่ม latency เล็กน้อย
Redis จะเป็น message broker และ database จะเก็บข้อมูล ต้องเข้าถึงทั้งสองตัวนี้ การรันแบบ distributed system ด้วย SQLite ไม่รองรับ
Migrate data
ถ้าต้องการย้ายข้อมูลจาก database หนึ่งไปอีกอัน ใช้คำสั่ง Export และ Import ดูรายละเอียดที่ CLI commands for n8n
Webhook processors#
Keep in mind
Webhook process ต้องใช้ Redis และต้องตั้ง EXECUTIONS_MODE ด้วย ดูวิธีตั้งค่าที่ configure the workers
Webhook processor เป็นอีกวิธีขยายระบบ n8n การตั้งค่านี้เป็นทางเลือก ช่วยให้รองรับ webhook request จำนวนมากพร้อมกัน แค่เพิ่ม webhook process และ worker ตามต้องการ
Webhook process จะฟัง request ที่ port เดียวกับ main (ปกติ 5678) รันใน container หรือเครื่องแยก แล้วใช้ load balancer ช่วยกระจาย request
n8n ไม่แนะนำให้เอา main process ไปรวมใน pool ของ load balancer เพราะจะทำให้ main รับ request เยอะเกิน ส่งผลให้ UI ช้า
สตาร์ท webhook processor ด้วยคำสั่งนี้จาก root directory:
1 | |
ถ้าใช้ Docker ใช้คำสั่งนี้:
1 | |
Configure webhook URL#
ตั้งค่า webhook URL ด้วยคำสั่งนี้บนเครื่องที่รัน main n8n instance:
1 | |
หรือจะตั้งใน configuration file ก็ได้
Configure load balancer#
ถ้าใช้ webhook process หลายตัว ต้องมี load balancer ช่วยกระจาย request ถ้าใช้ domain เดียวกับ n8n instance และ webhook ให้ตั้ง load balancer แบบนี้:
- redirect request ที่ขึ้นต้นด้วย
/webhook/*ไปที่ webhook server pool - path อื่น (API, static file, editor) ให้ไป main process
Note: URL สำหรับ manual workflow execution คือ /webhook-test/* ให้ route ไป main process ด้วย
คุณสามารถเปลี่ยน path นี้ใน configuration file endpoints.webhook หรือใช้ N8N_ENDPOINT_WEBHOOK environment variable ถ้าเปลี่ยน path อย่าลืมอัปเดต load balancer
Disable webhook processing in the main process (optional)#
ถ้ามี webhook processor แล้ว คุณสามารถปิด webhook processing ใน main process ได้ เพื่อให้ webhook execution ไปที่ webhook processor ทั้งหมด ตั้งค่า endpoints.disableProductionWebhooksOnMainProcess เป็น true ใน configuration file
หรือใช้คำสั่งนี้:
1 | |
เมื่อปิด webhook ใน main process ให้รัน main process ปกติ และอย่าเอาไปใส่ใน pool ของ load balancer
Configure worker concurrency#
คุณสามารถกำหนดจำนวน job ที่ worker ทำพร้อมกันได้ด้วย flag concurrency ค่าเริ่มต้นคือ 10 ถ้าจะเปลี่ยนใช้แบบนี้:
1 | |
Concurrency and scaling recommendations#
n8n แนะนำให้ตั้ง concurrency ของ worker ที่ 5 ขึ้นไป ถ้าตั้งค่าน้อยแต่มี worker เยอะ อาจทำให้ database connection pool เต็ม ส่งผลให้ process ช้าและ error
Multi-main setup#
Feature availability
- ใช้ได้เฉพาะ Self-hosted Enterprise plans
- ถ้าอยากใช้บน Cloud Enterprise ติดต่อ n8n
ใน queue mode คุณสามารถรัน main process หลายตัวเพื่อ high availability
ใน single-mode main process จะทำ 2 อย่าง:
- regular tasks เช่น รัน API, เสิร์ฟ UI, ฟัง webhook
- at-most-once tasks เช่น รัน non-HTTP trigger (timer, poller, connection แบบ RabbitMQ, IMAP), ลบ execution เก่า, ลบ binary data
ใน multi-main setup จะมี main process 2 แบบ:
- followers ทำ regular tasks
- leader ทำ regular tasks และ at-most-once tasks
Leader designation#
ใน multi-main setup ทุก main instance จะจัดการ leadership เอง ถ้า leader เดิมล่ม (เช่น crash หรือ event loop ช้า) follower ตัวอื่นจะ takeover ถ้า leader เดิมกลับมา จะกลายเป็น follower
Configuring multi-main setup#
ถ้าจะ deploy n8n แบบ multi-main ให้แน่ใจว่า:
- main process ทุกตัวรัน queue mode และเชื่อมต่อ Postgres กับ Redis
- main และ worker ทุกตัวใช้ n8n version เดียวกัน
- main ทุกตัวตั้ง environment variable
N8N_MULTI_MAIN_SETUP_ENABLEDเป็นtrue - main ทุกตัวอยู่หลัง load balancer ที่เปิด session persistence (sticky session)
ถ้าต้องการ ปรับ leader key options ได้:
| Using configuration file | Using environment variables | Description |
|---|---|---|
multiMainSetup.ttl:10 |
N8N_MULTI_MAIN_SETUP_KEY_TTL=10 |
อายุ (วินาที) ของ leader key ใน multi-main setup |
multiMainSetup.interval:3 |
N8N_MULTI_MAIN_SETUP_CHECK_INTERVAL=3 |
interval (วินาที) สำหรับเช็ค leader ใน multi-main setup |